When you’re new to Divi, the Theme Options can be a little overwhelming.
Luckily, they don’t contain anything too tricky.
Some concern design. Others deal with integrations, the WordPress backend, or other important areas. But none of them require an expert.
In this Divi Theme Options Guide, we’ll try to make it as easy as possible.
Simply steal our settings and go.
Divi Theme Options
Divi offers pretty much everything a webmaster needs.
Depending on what you want to do with your website, you may need to adjust your settings. Here, we’ll assume you’ve already installed WordPress, edited your WordPress settings, installed Divi, and are ready to begin to designing your site.
You can also use this to check against a site you already have but it’s always better to get it right before you begin.
We always recommend checking these twice.
General
Divi General Settings are fairly basic.
This is where you find social media profiles, date format, and other basic options. It’s also where you choose which colors you would like in your custom color palette. Aside from these, the most important thing to do here is to add your logo so that it appears in the menu bar.
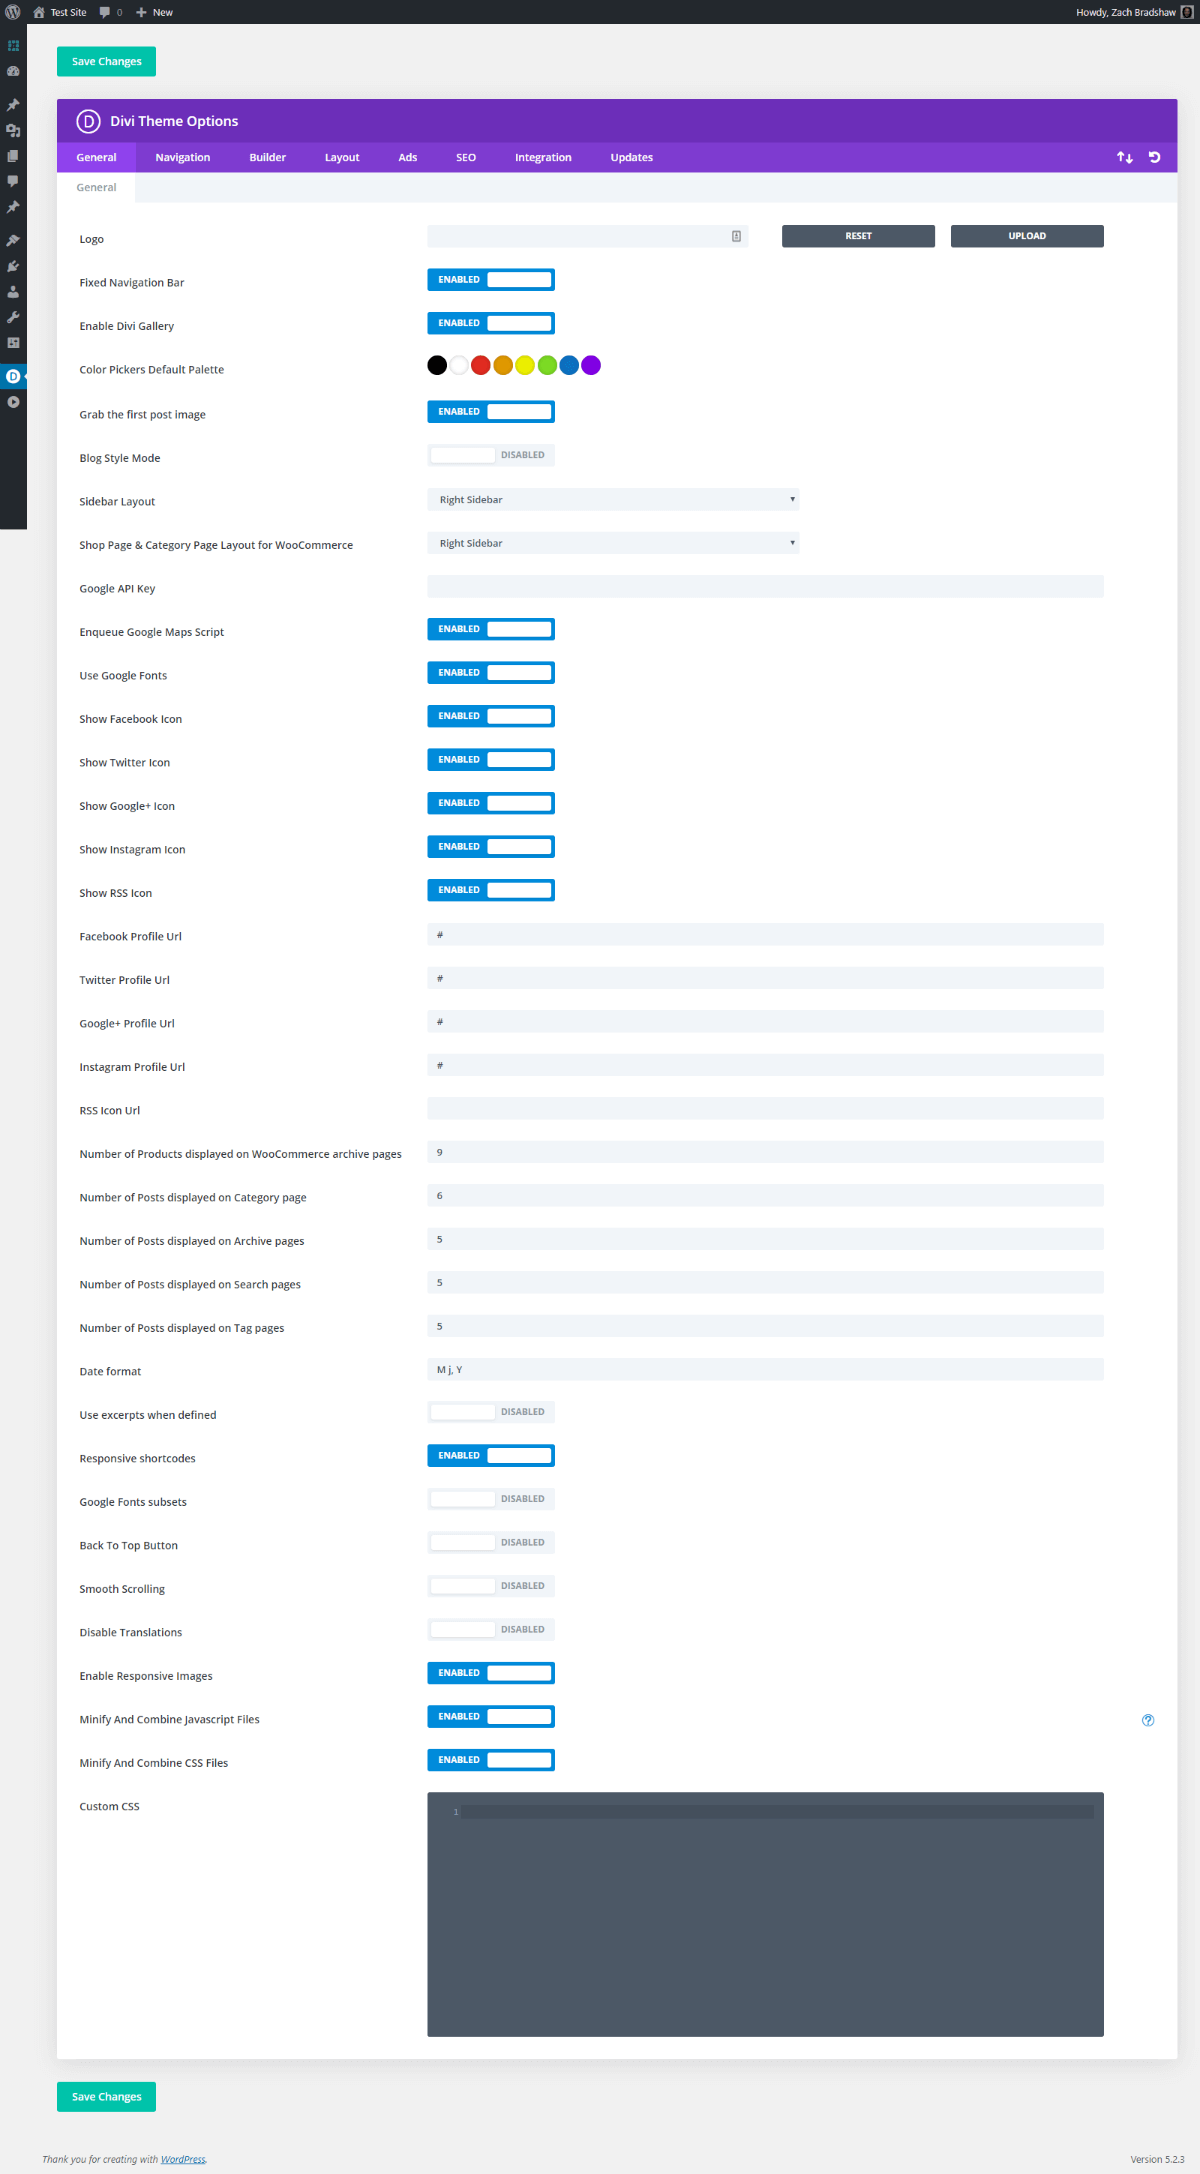
Go to Divi >>> Theme Options.
Copy these settings:
If you’d like more detail:
Divi General Theme Options Overview
- Set Logo – Add your logo. It will appear in the menu bar based on your Customizer settings.
- Set Fixed Navigation Bar – Enable for a sticky menu bar that remains visible as users scroll.
- Set Enable Divi Gallery – Enable for the ability to add Divi’s gallery to content in Classic Editor.
- Set Color Pickers Default Palette – Set your default color palette. Reflected in Divi Builder.
- Set Grab the first post image – Enable to use the first image as the featured image if none set.
- Set Blog Style Mode – Disable to use post excerpts on archive pages. Enable for full posts.
- Set Sidebar Layout – Choose Right Sidebar for the default blog look. Can edit per page/post.
- Set Shop Page & Category… – Choose Right Sidebar for default shop look with WooCommerce.
- Set Google API Key – Add your Google API key for proper functioning of Divi Maps Modules.
- Set Enqueue Google Maps Script – Enable for proper functioning of Divi Maps Modules.
- Set Use Google Fonts – Enable to use the Google Fonts libraries within the Divi Builder.
- Set Show Facebook Icon – Enable to display the Facebook icon in Divi’s top and bottom bars.
- Set Show Twitter Icon – Enable to display the Twitter icon in Divi’s top and bottom bars.
- Set Show Google+ Icon – Enable to display the Google+ icon in Divi’s top and bottom bars.
- Set Show Instagram Icon – Enable to display the Instagram icon in Divi’s top and bottom bars.
- Set Show RSS Icon – Enable to display the RSS feed icon in Divi’s top and bottom bars.
- Set Facebook Profile URL – Add your Facebook Page URL for top and bottom bar links.
- Set Twitter Profile URL – Add your Twitter Profile URL for top and bottom bar links.
- Set Google+ Profile URL – Add your Google Maps Page URL for top and bottom bar links.
- Set Instagram Profile URL – Add your Instagram Profile URL for top and bottom bar links.
- Set RSS Icon URL – Add your preferred RSS feed URL for top and bottom bar links.
- Set Number of Products… Archive… – Enter a “9” or your preferred number of products.
- Set Number of Posts… Category… – Enter a “6” or your preferred number of posts.
- Set Number of Posts… Archive… – Enter a “5 or your preferred number of posts.
- Set Number of Posts… Search… – Enter a “5” or your preferred number of posts.
- Set Number of Posts… Tag… – Enter a “5” or your preferred number of posts.
- Set Date format – Enter “M j, Y” or your preferred date format based on the WP codex.
- Set Use excerpts when defined – Disable the use of excerpts unless you use them.
- Set Responsive shortcodes – Enable to make shortcodes respond to various screen sizes.
- Set Google Fonts subsets – Disable unless you need Google’s Non-English font library.
- Set Back to Top Button – Disable Back to Top unless you prefer it with your design.
- Set Smooth Scrolling – Disable Smooth Scrolling unless you prefer it with your design.
- Set Disable Translations – Disable unless you need translated theme strings on your site.
- Set Enable Responsive Images – Enable responsive image sizes for better page performance.
- Set Minify & Combine Javascript Files – Enable this option to speed up your site’s page load.***
- Set Minify & Combine CSS Files – Enable this option to speed up your site’s page load.***
- Set Custom CSS – Add your custom CSS to Divi here. Also available in Theme Customizer.
***May cause compatibility issues with certain web hosts, plugins, or other WordPress technology.
Navigation
Divi Navigation Settings are also basic.
We prefer to customize our menu elsewhere in WordPress. But a quick run through is always smart. Plus, you might even find that some of these options suit your needs. For example, you could use these options to automate menu updates or optimize your one page website design.
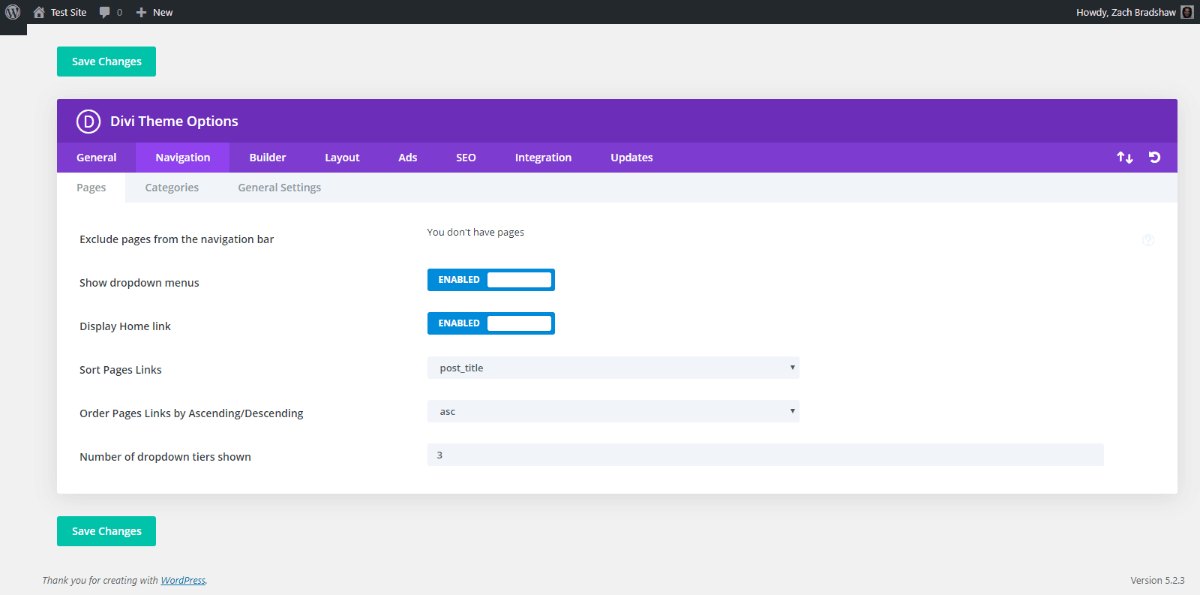
Go to Navigation >>> Pages.
Copy these settings:
If you’d like more detail:
Divi Pages Navigation Theme Options Overview
- Set Exclude pages from the… – Edit your menu here if you aren’t using default WP menus.
- Set Show dropdown menus – Enable the use of dropdown menus on the navigation bar.
- Set Display Home link – Enable your home page link if you aren’t using default WP menus.
- Set Sort Pages Links – Choose “post_title” or your preferred navigation sorting variable.
- Set Order Pages Links by… – Choose “asc” or your preferred navigation sorting order.
- Set Number of dropdown tiers… – Enter “3” dropdown tiers or your preferred number.
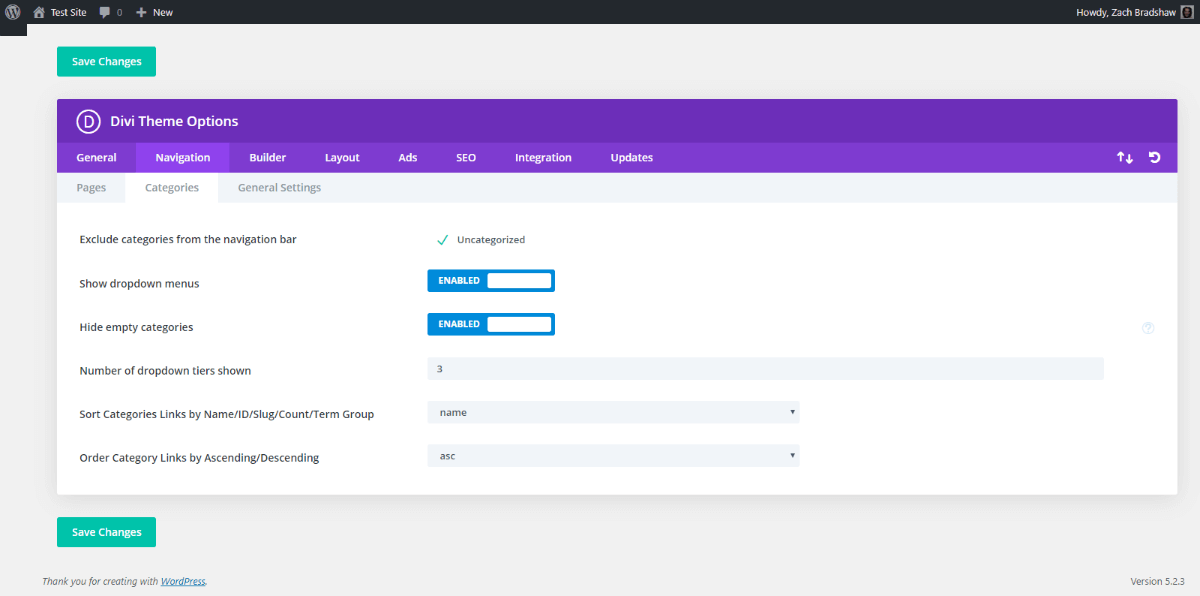
Go to Navigation >>> Categories.
Copy these settings:
If you’d like more detail:
Divi Categories Navigation Theme Options Overview
- Set Exclude categories from the… – Edit your menu here if you aren’t using default WP menus.
- Set Show dropdown menus – Enable the use of dropdown menus on the navigation bar.
- Set Hide empty categories – Enable this to hide categories that do not have posts in them.
- Set Number of dropdown tiers… – Enter “3” dropdown tiers or your preferred number.
- Set Sort Categories Links… – Choose “name” or your preferred navigation sorting variable.
- Set Order Category Links… – Choose “asc” or your preferred navigation sorting order.
Go to Navigation >>> General Settings.
Copy these settings:
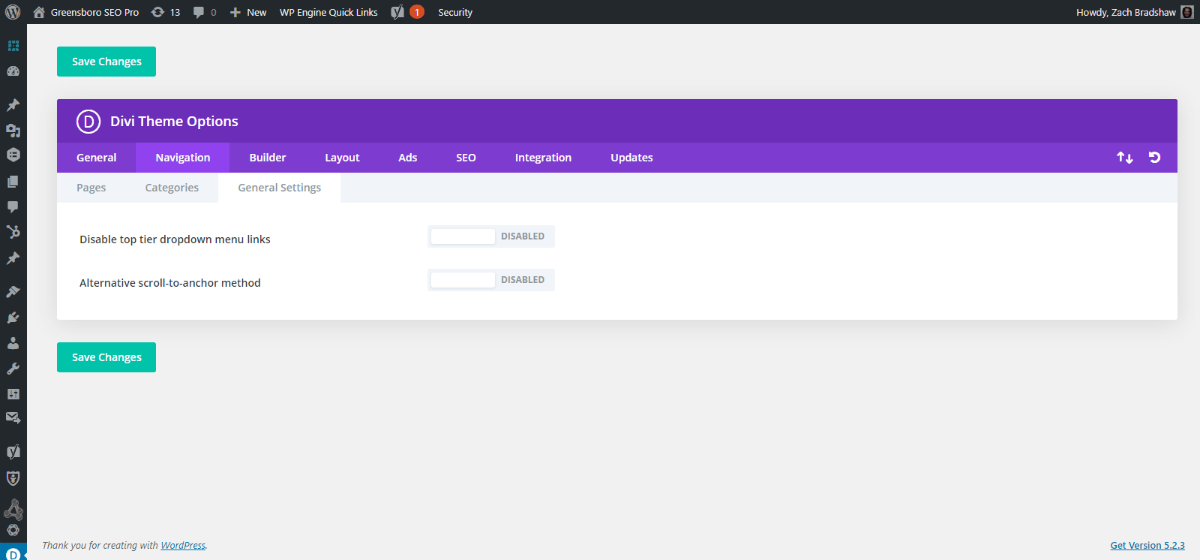
Divi General Navigation Theme Options Overview
- Set Disable top tier dropdown… – Disable this unless you prefer to use parent category links.
- Set Alternative scroll-to-anchor… – Disable this unless your anchor links are inaccurate.
Builder
Divi Builder Settings is another important but short list.
The builder settings let you customize your overall Divi experience. Choose whether to use the new WordPress block editor or not. Enable the Divi builder on a per-post-type basis. And refine your CSS outputs.
Go to Builder >>> Post Type Integration.
Copy these settings:
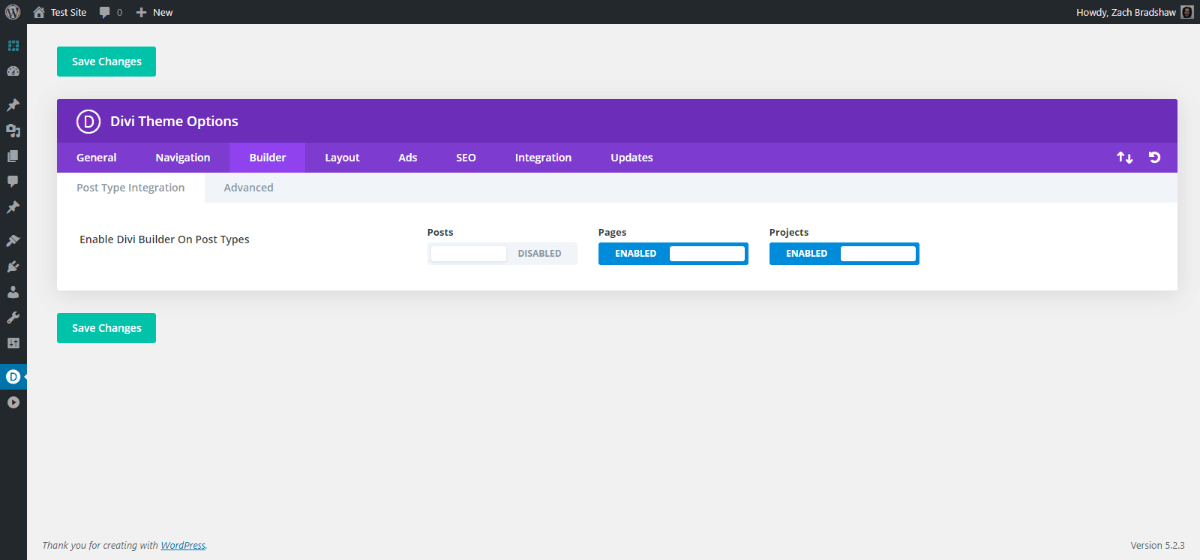
Divi Builder Post Type Theme Options Overview
- Set Enable Divi Builder on post … – Disable the the Divi Builder on any post types you prefer.
Go to Builder >>> Advanced.
Copy these settings:
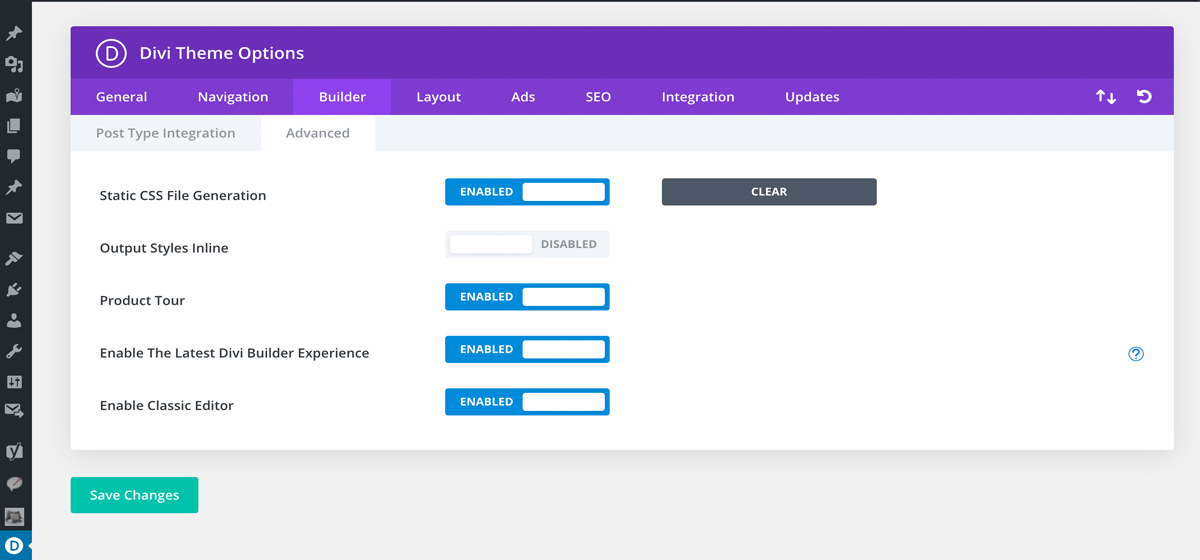
Divi Builder Advanced Theme Options Overview
- Set Static CSS File Generation – Enable this option to cache your CSS for better performance.
- Set Output Styles Inline – Disable this option unless you need/prefer Divi’s old output styles.
- Set Product Tour – Enable to get a tour of Divi Builder the first time a user opens it. Very helpful.
- Set Enable The Latest Divi Builder… – Enable to maximize all the features Divi 4 has to offer.
- Set Enable Classic Editor – Enable the Classic Editor to use the WYSIWYG editor for posts.
Layout
Divi Layout Settings are another simple group.
Here, you’ll find a few basic settings for post metadata, thumbnails, and comments. If you don’t have a blog, you can skip most of this. But if you do, these settings can affect the engagement rates of your content.
Go to Layout >>> Single Post Layout.
Copy these settings:
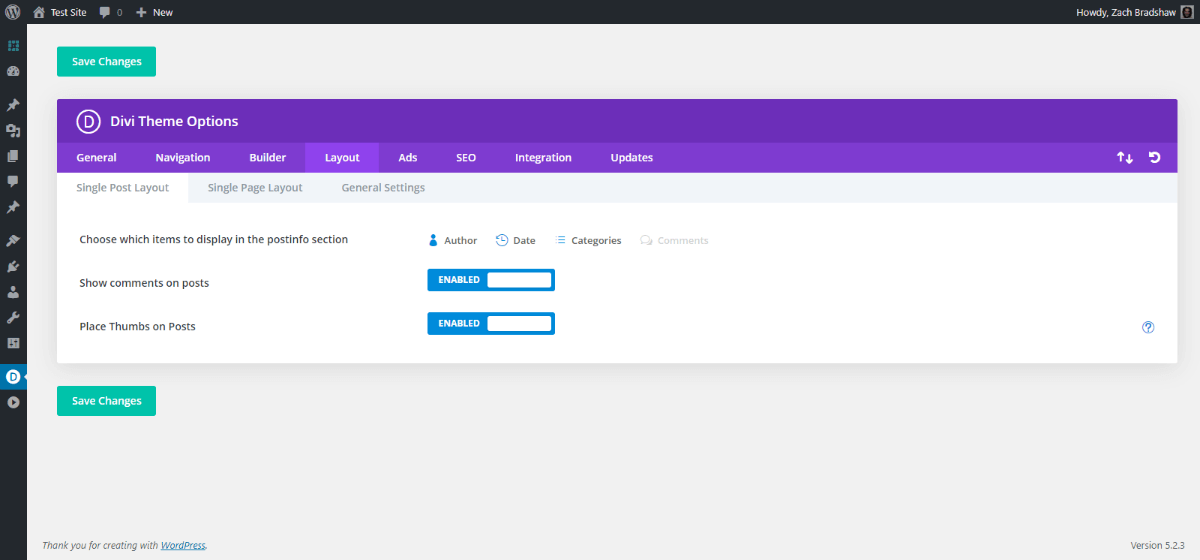
Divi Single Post Layout Theme Options Overview
- Set Choose which items to display… – Choose author, date, and categories or your preference.
- Set Show comments on posts – Enable comments to allow users to comment on your posts.
- Set Place Thumbs on Posts – Enable this option to use your featured images as post headers.
Go to Navigation >>> Single Page Layout.
Copy these settings:
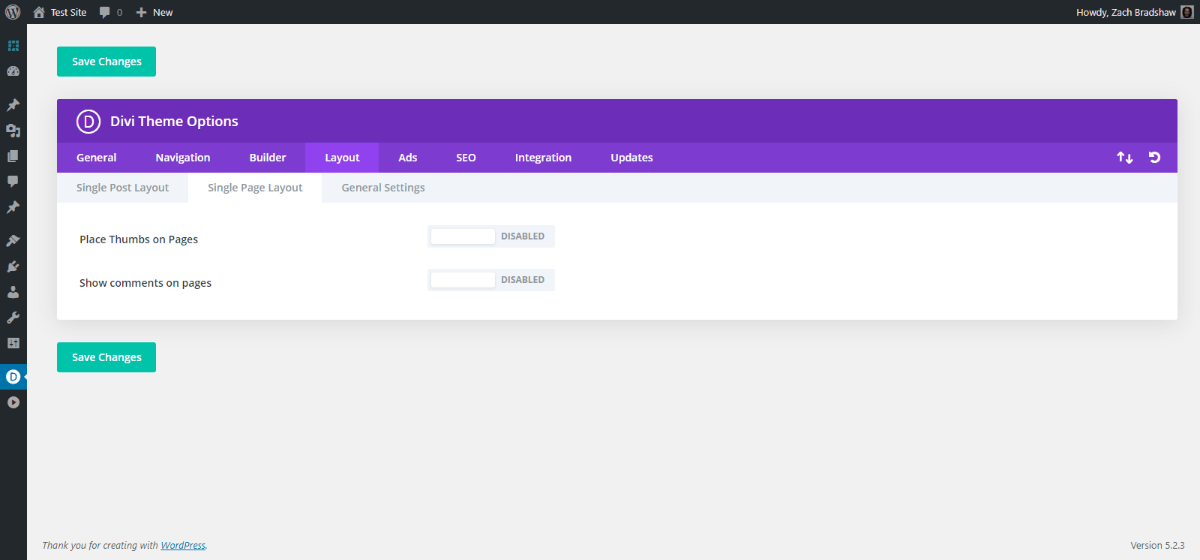
Divi Single Page Layout Theme Options Overview
- Set Place Thumbs on Pages – Disable to prevent featured images displaying as page headers.
- Set Show comments on pages – Disable to remove the comment section from your pages.
Go to Layout >>> General Settings.
Copy these settings:
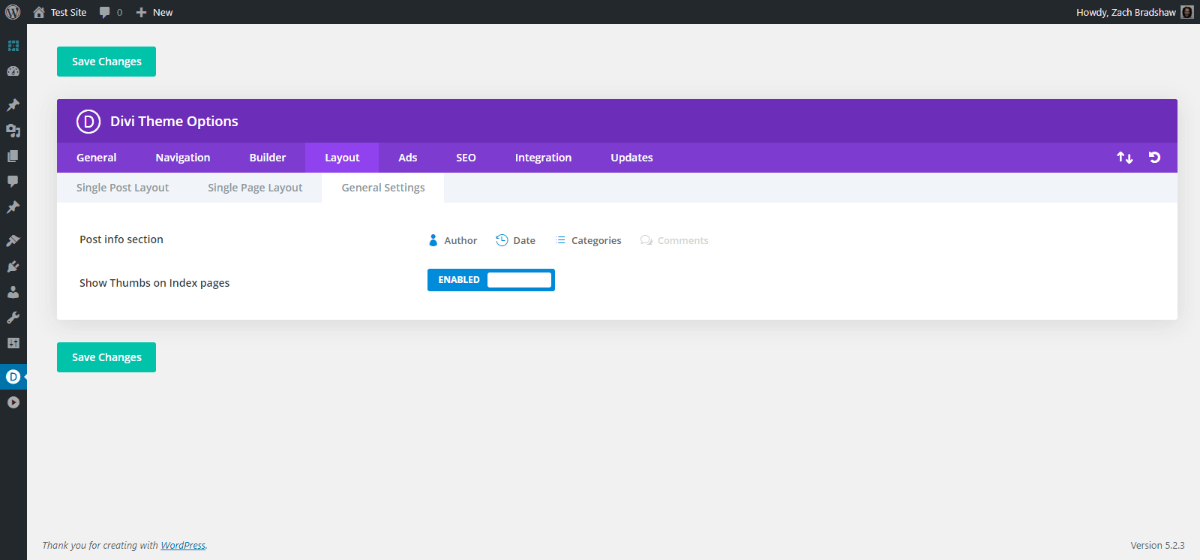
Divi General Layout Theme Options Overview
- Set Post info section – Choose author, date, and categories or your preference.
- Set Show Thumbs on Index Pages – Enable featured images on post archives.
Ads
Divi Ads Settings aren’t that robust.
They allow you to add an adsense banner at the bottom of your blog posts. It’s not much, but at least it is easy to use.
Go to Ads >>> Manage Un-widgetized Advertisements.
Copy these settings:
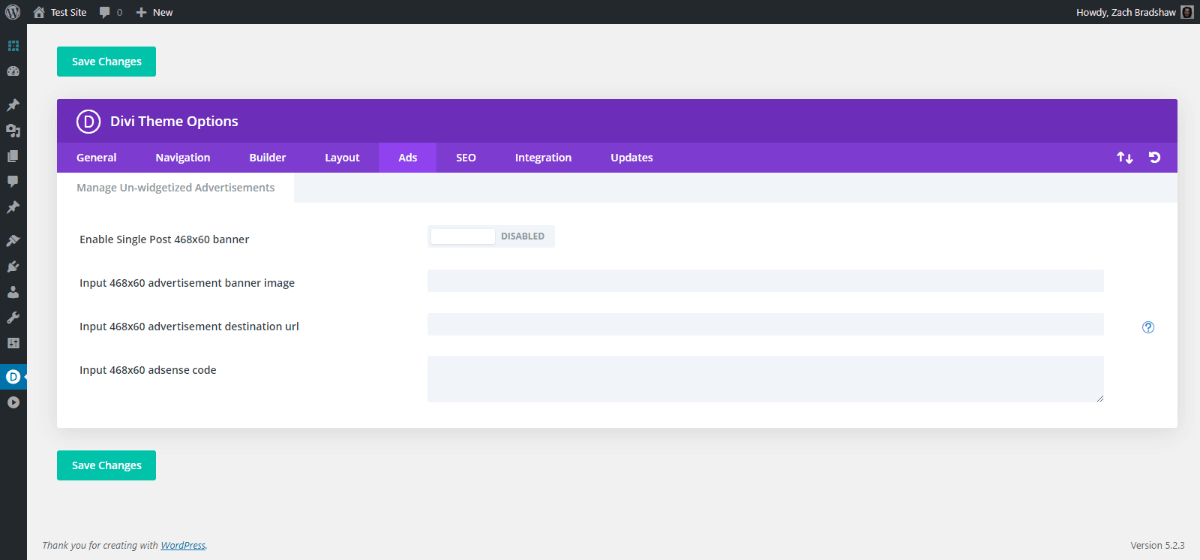
Divi Ads Theme Options Overview
- Set Disable Single Post 468×60 banner – Disable unless you want a basic advertising banner.
- Set Input 468×60 advertisement banner… – Leave blank or add your AdSense banner URL.
- Set Input 468×60 advertisement destination… – Leave blank or add your destination URL.
- Set Input 468×60 adsense code – Leave blank or add your AdSense destination code.
SEO
Divi SEO Settings are pretty good as far as WP themes go.
We prefer to use dedicated SEO plugins. But you can definitely pull off some decent SEO with Divi’s SEO settings alone. Titles, meta descriptions, canonical URLs—not bad at all.
Go to Divi >>> Theme Options.
Copy these settings:
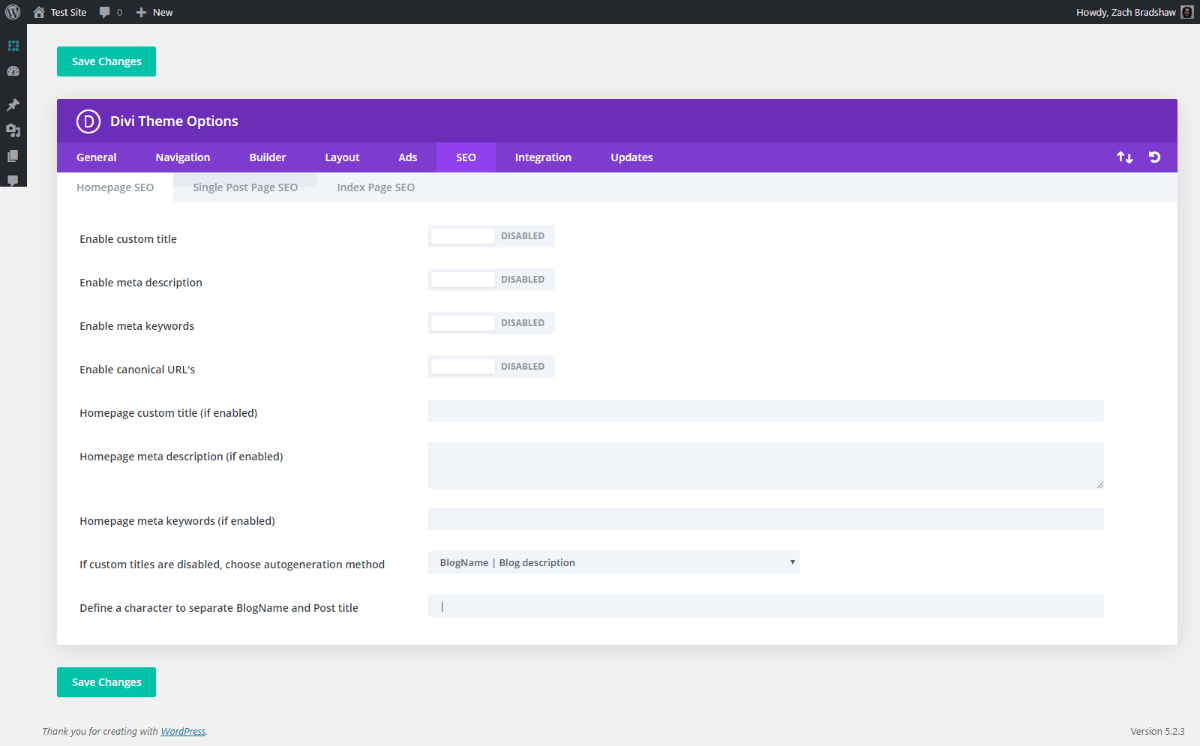
Divi Homepage SEO Theme Options Overview
- Set Enable Custom Title – Disable unless you prefer to set your titles in Divi directly.
- Set Enable Meta Description – Disable unless you prefer to set your descriptions in Divi directly.
- Set Enable Meta Keywords… – Disable and forget these exist, as they are no longer relevant.
- Set Enable Canonical URL’s – Disable unless you need to set canonical URLs with Divi.
- Set Homepage Custom Title… – Leave blank unless you have enabled custom titles.
- Set Homepage Meta Description… – Leave blank unless you have enabled meta descriptions.
- Set Homepage Meta Keywords… – Leave blank and forget these exist, as they are not relevant.
- Set If Custom Titles are Disabled… – Choose “BlogName | BlogDecription as default title.
- Set Define a Character to Separate… – Enter ” | ” as the character to separate the title.
Go to SEO >>> Single Post Page SEO.
Copy these settings:
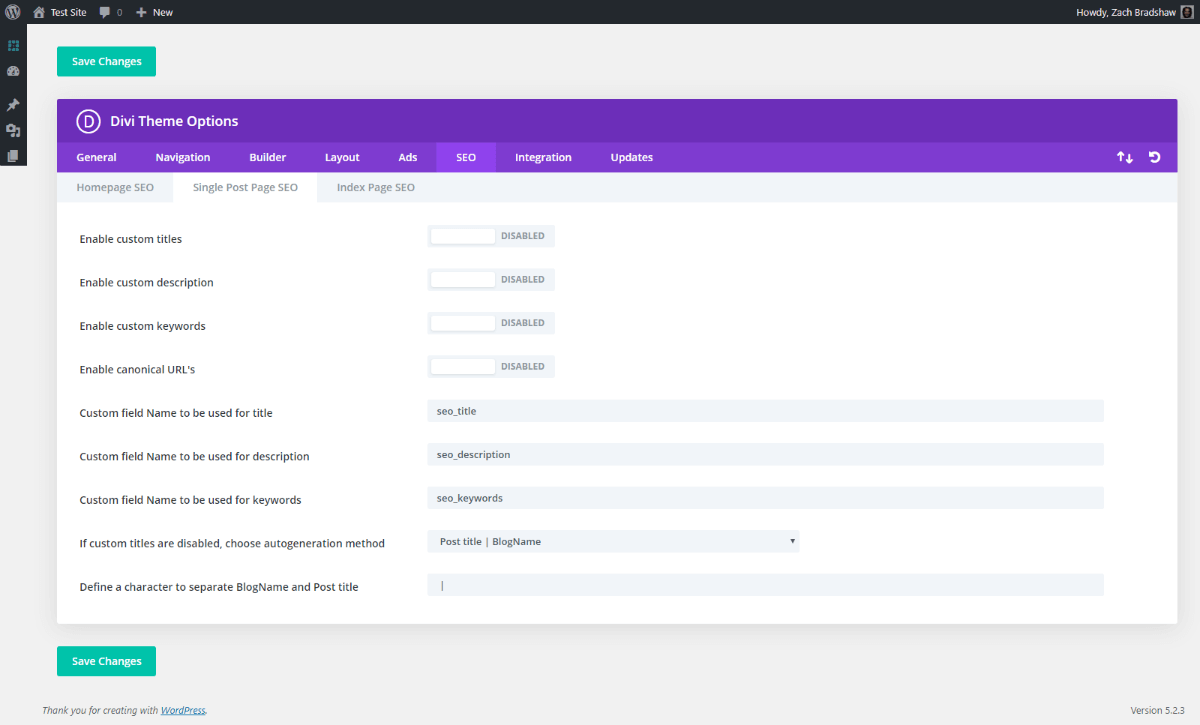
Divi Single Post Page SEO Theme Options Overview
- Set Enable Custom Titles – Disable unless you prefer to set your titles in Divi directly.
- Set Enable Custom Description – Disable unless you prefer to set meta descriptions in Divi.
- Set Enable Custom Keywords – Disable and forget these exist, as they are no longer relevant.
- Set Enable Canonical URL’s – Disable unless you need to set canonical URLs with Divi.
- Set Custom Field Name.. Title – Leave default unless you have enabled custom titles.
- Set Custom Field Name… Description – Leave default unless you are using custom descriptions.
- Set Custom Field Name… Keywords – Leave blank and forget these exist, as they are not relevant.
- Set If Custom Titles are Disabled… – Choose “Post title | BlogName as default title.
- Set Define a Character to Separate… – Enter ” | ” as the character to separate the title.
Go to SEO >>> Index Page SEO.
Copy these settings:
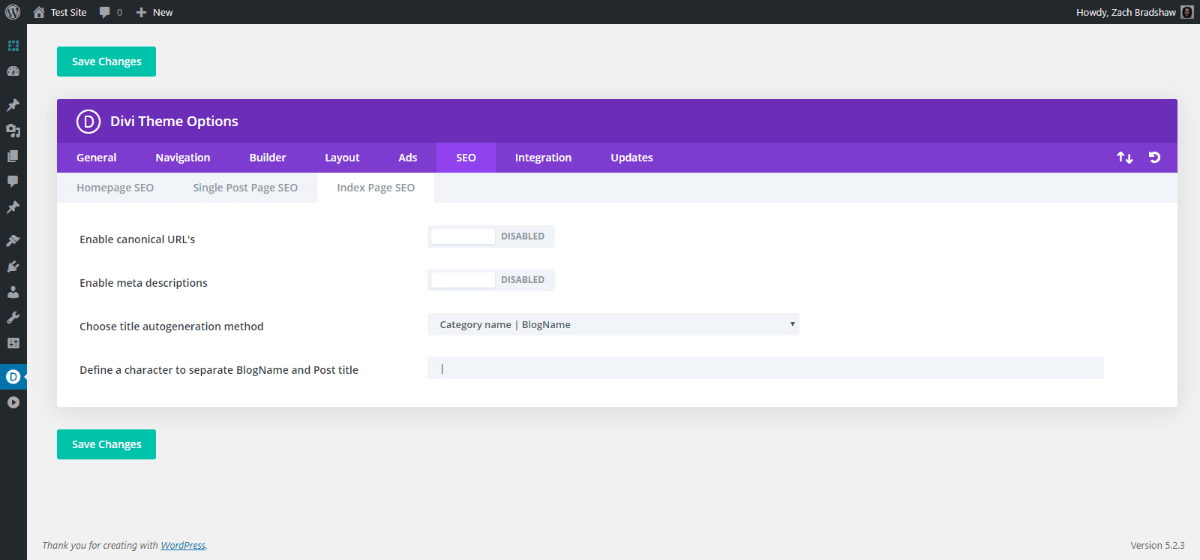
Divi Index Page SEO Theme Options Overview
- Set Enable Canonical URL’s – Disable unless you need to set canonical URLs with Divi.
- Set Enable Meta Descriptions – Disable unless you prefer to set meta descriptions in Divi.
- Set Choose Title Autogeneration… – Choose “Category name | BlogName as default title.
- Set Define a Character to Separate… – Enter ” | ” as the character to separate the title.
Integration
Divi Integration Settings are crucial for advanced marketing.
If you want a website that makes you money, you’ll definitely have some code to add here. This area prevents the need for extra plugins for your marketing scripts and other advanced customizations.
Go to Integration >>> Code Integration.
Copy these settings:
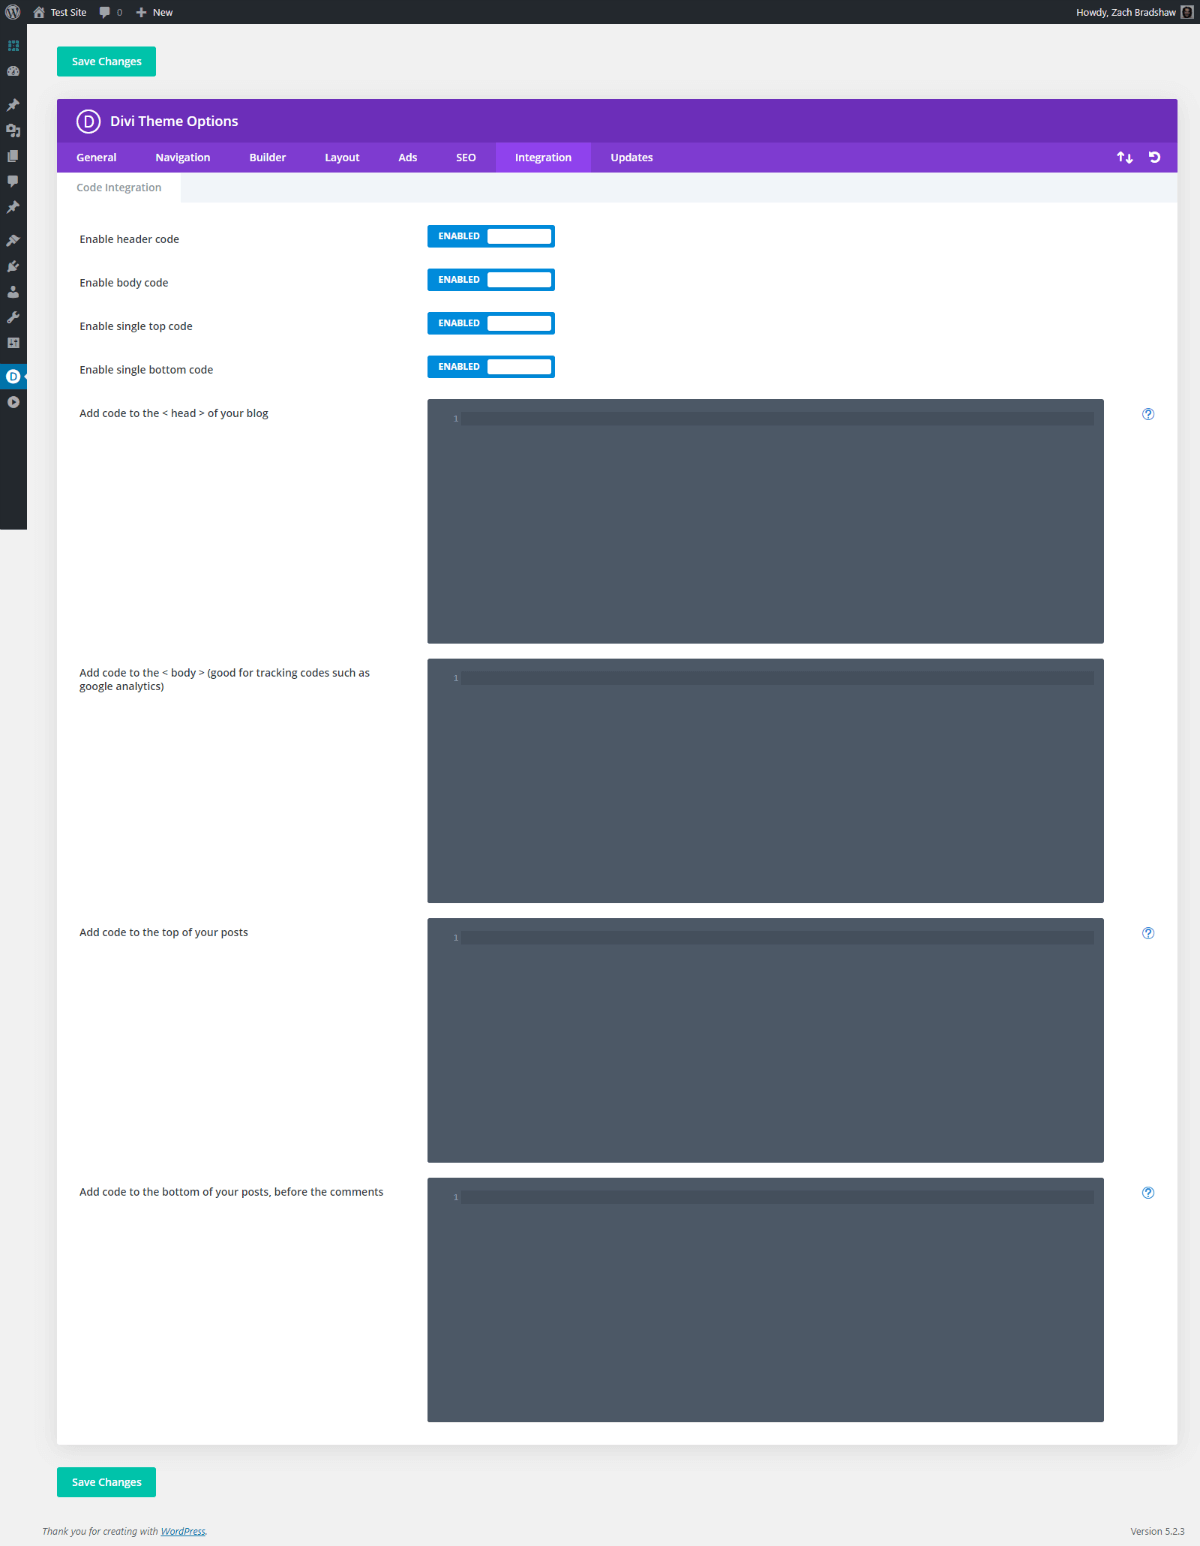
Divi Code Integration Theme Options Overview
- Set Enable Header Code – Enable to add code to the < head > of all website pages.
- Set Enable Body Code – Enable to add code to the top of the < body > of all website pages.
- Set Enable Single Top Code – Enable to add code specifically to the top of all blog posts.
- Set Enable Single Bottom Code – Enable to add code specifically to the bottom of all blog posts.
- Set Add Code to the < Head >… – Enter your preferred < head > code here.
- Set Add Code to the < Body >… – Enter your preferred < body > code here.
- Set Add Code to the Top… – Enter your preferred top of post code here.
- Set Add Code to the Bottom… – Enter your preferred bottom of post code here.
Updates
Divi Updates Settings are needed to keep your Divi install current.
Username and password is all you need to enter here. This should have been completed when you installed Divi.
Go to Updates >>> General.
Copy these settings:
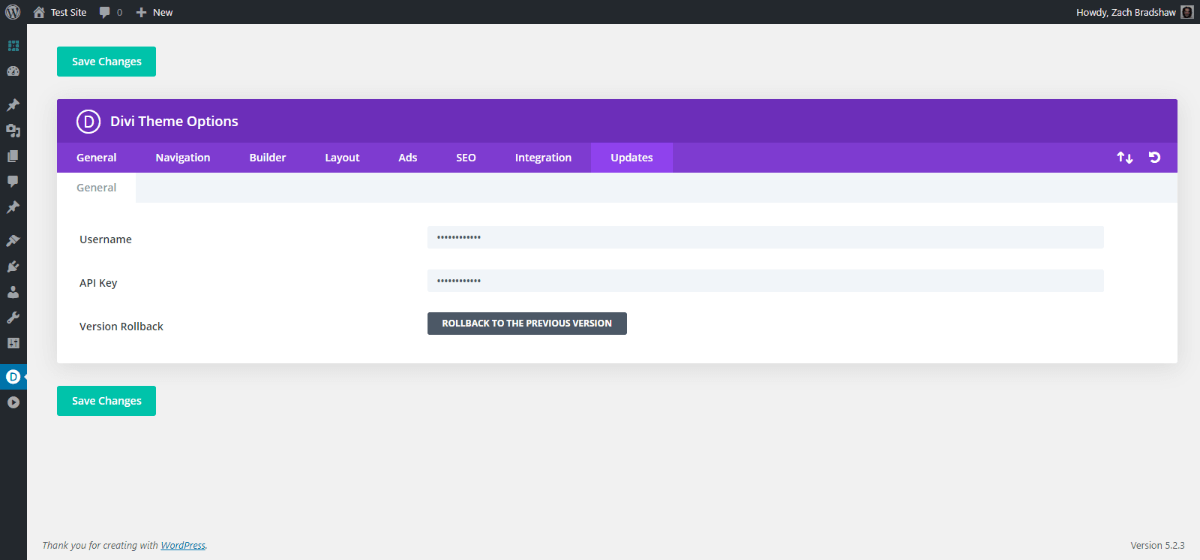
Divi Updates Theme Options Overview
- Set Username – Enter your Elegant Themes Username here to receive product updates
- Set API Key – Enter your Elegant Themes API Key here to receive product updates.
- Set Version Rollback – If you need to rollback a recent update, you can do so here.
Beyond the Basics
There are a variety of reasons your settings may differ.
If you’re just getting started, you can pretty much copy our settings and go. Over time, you can figure out how to further utilize Divi to achieve your digital marketing goals.
Combining Divi’s Theme Options with the Customizer, Theme Builder, Dynamic Content, and other features you can create just about anything you want to create.
You don’t need much to create a beautiful site that helps automate your sales process. You just need Divi.
That’s one of the reasons why we choose it.
In the right hands, it truly is a “do anything” WordPress theme.
Have questions or comments about the enormous list of options Divi gives you? Please drop them below. We love to help others get it right. Plus, we’re always looking to improve our training. And if you’d like help with WordPress Optimization, you can get started with a free SEO audit.