It’s crucial to get your WordPress Settings correct.
Luckily, they are fairly simple.
Sure. There are a lot of them.
But none of them are very complicated. And many of them are important for SEO, sales, user experience, and more.
In this WordPress Basic Settings Guide, we’ll make it easy.
Simply steal our settings and go.
Basic WordPress Settings
Not all WordPress installs are created equal.
Your options may change depending on your WordPress version, theme selection, additional plugins, and more. You may have extra options under Settings. Or may have extra options on individual pages under Settings.
Here, we focus on the essentials.
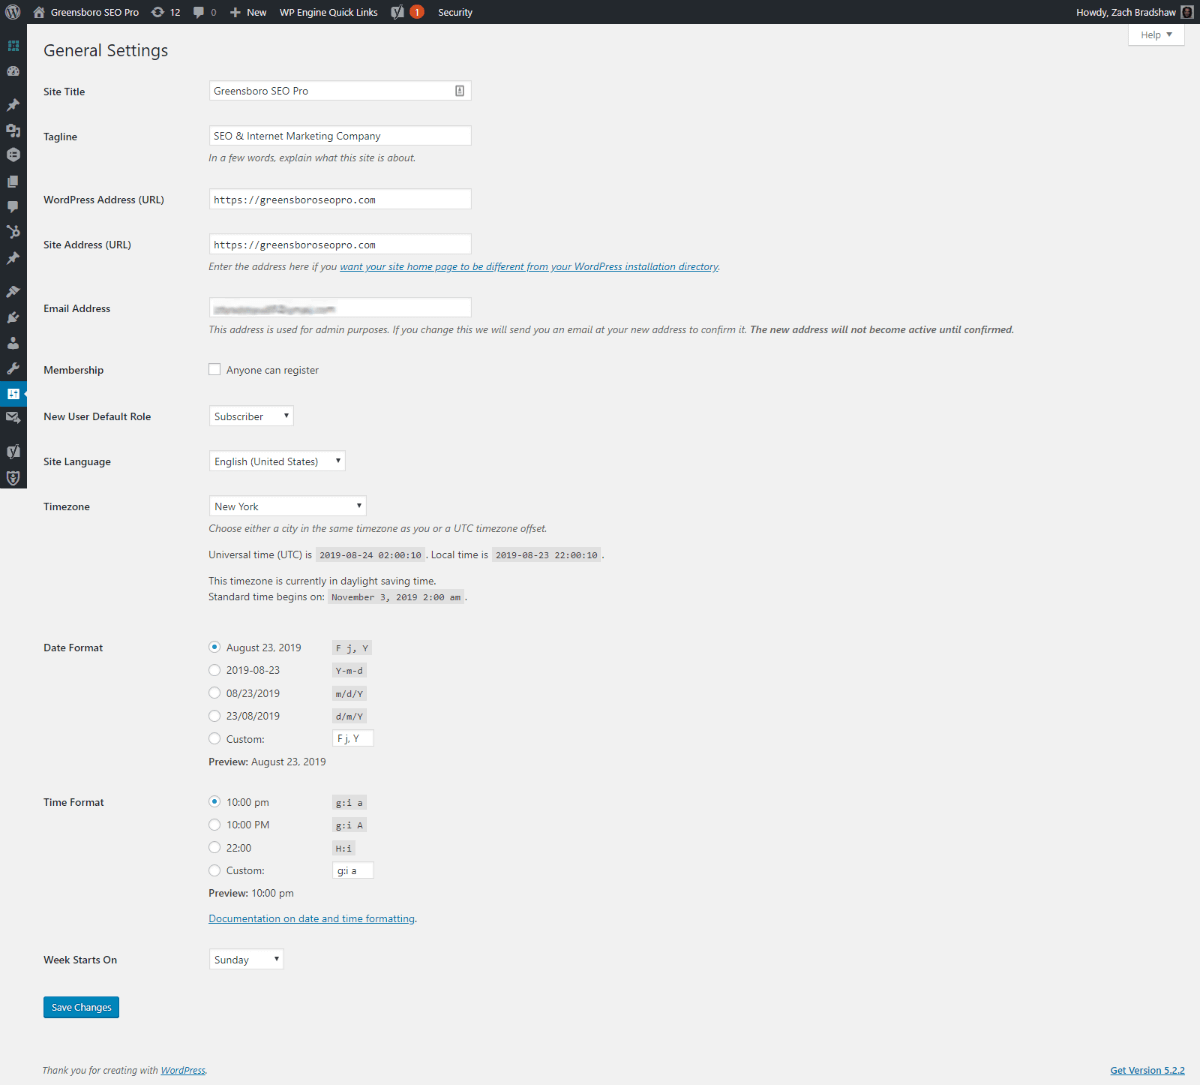
WordPress General Settings
WordPress General Settings are fairly basic.
This is where you find timezone, language, and other basic options. It’s also where you choose your website address (http, https, www, etc.) and admin email. Aside from these, the most important thing to do here is to restrict user sign ups by unchecking the open registration option.
Go to Settings >>> General.
Copy these settings:
If you’d like a little more detail:
WordPress General Settings Overview
- Set Site Title – The name of your website. Operates as first part of title tag if none set.
- Set Tagline – The tagline for your brand. Operates as second part of title tag if none set.
- Set WordPress Address – The URL for your wordpress install. Usually matches site address.
- Set Site Address – The complete URL for your website. Should match DNS settings.
- Set Admin Email – This email address will receive WordPress notifications by default.
- Set Membership – Uncheck “Anyone can register” box (unless you need a membership site).
- Set New User Default Role – Choose “Subscriber.” Only matters for membership sites.
- Set Site Language – Choose English (United States) or your preferred language.
- Set Timezone – Choose New York or whatever is appropriate for your brand.
- Set Date Format – Leave default or choose whatever is appropriate for your brand.
- Set Time Format – Leave default or choose whatever is appropriate for your brand.
- Set Week Starts On – Choose Sunday or whatever is appropriate for your brand.
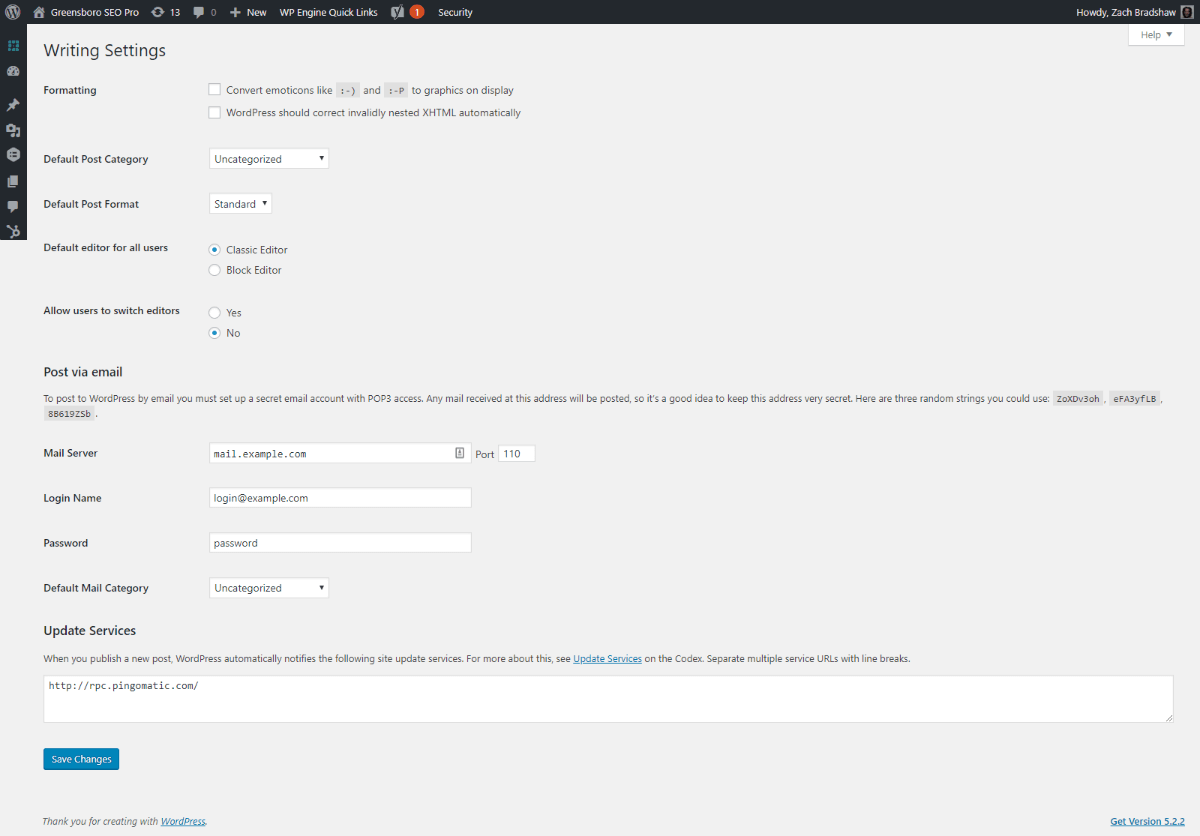
WordPress Writing Settings
WordPress Writing Settings are also basic.
For most websites, there are only a few options that need consideration here. Some webmasters could even ignore this. It’s always good to check though.
Go to Settings >>> Writing.
Copy these settings:
If you’d like more detail:
WordPress Writing Settings Overview
- Set Formatting – Uncheck both options. Do not appear in modern WordPress installs.
- Set Default Post Category – Select your preferred category or leave as “Uncategorized.”
- Set Default Post Format – Most webmasters should leave this set to “Standard.”
- Set Default editor for all users – Choose “Classic Editor” for a simpler blogging process.***
- Set Allow users to switch editors – Choose “No” to keep page formatting consistent.
- Ignore Post via email – The majority of modern webmasters can skip these settings.
***Classic Editor must be enabled through plugin or theme settings in order for these settings to appear. We prefer the WordPress “Classic Editor” for blogging. For static pages, we use the Divi Builder instead of either option.
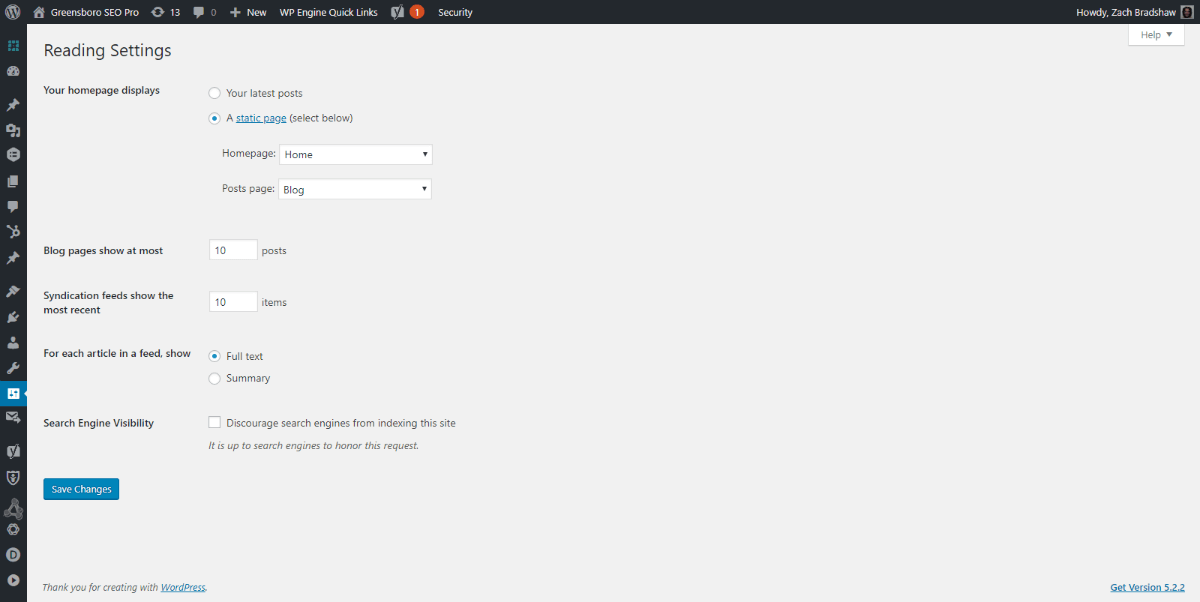
WordPress Reading Settings
WordPress Reading Settings has another short list.
Most of these are fairly important. This is where you choose either a static homepage or a blogroll. It’s where you’ll find feed settings and the option to discourage search engines from indexing your site.
Go to Settings >>> Reading.
Copy these settings:
If you’d like more detail:
WordPress Reading Settings Overview
- Set Your homepage displays – Choose “A static page (select below)” for a custom home.
- Set Homepage – Choose “Home” or the name of your intended homepage in WordPress.
- Set Posts page – Choose “Blog” or the name of your intended blogroll in WordPress.***
***You may leave Posts page unselected if you do not want a blog or plan to create a dynamic blog hub page.
- Set Blog pages show at most – Enter “10” posts or your preferred blogroll length.
- Set Syndication feeds show… – Enter “10” items or your preferred RSS feed length.
- Set For each article in a feed… – Choose “Full text” for full length RSS feed items.
- Set Search Engine Visibility – Uncheck “Discourage search engines from indexing this site.”
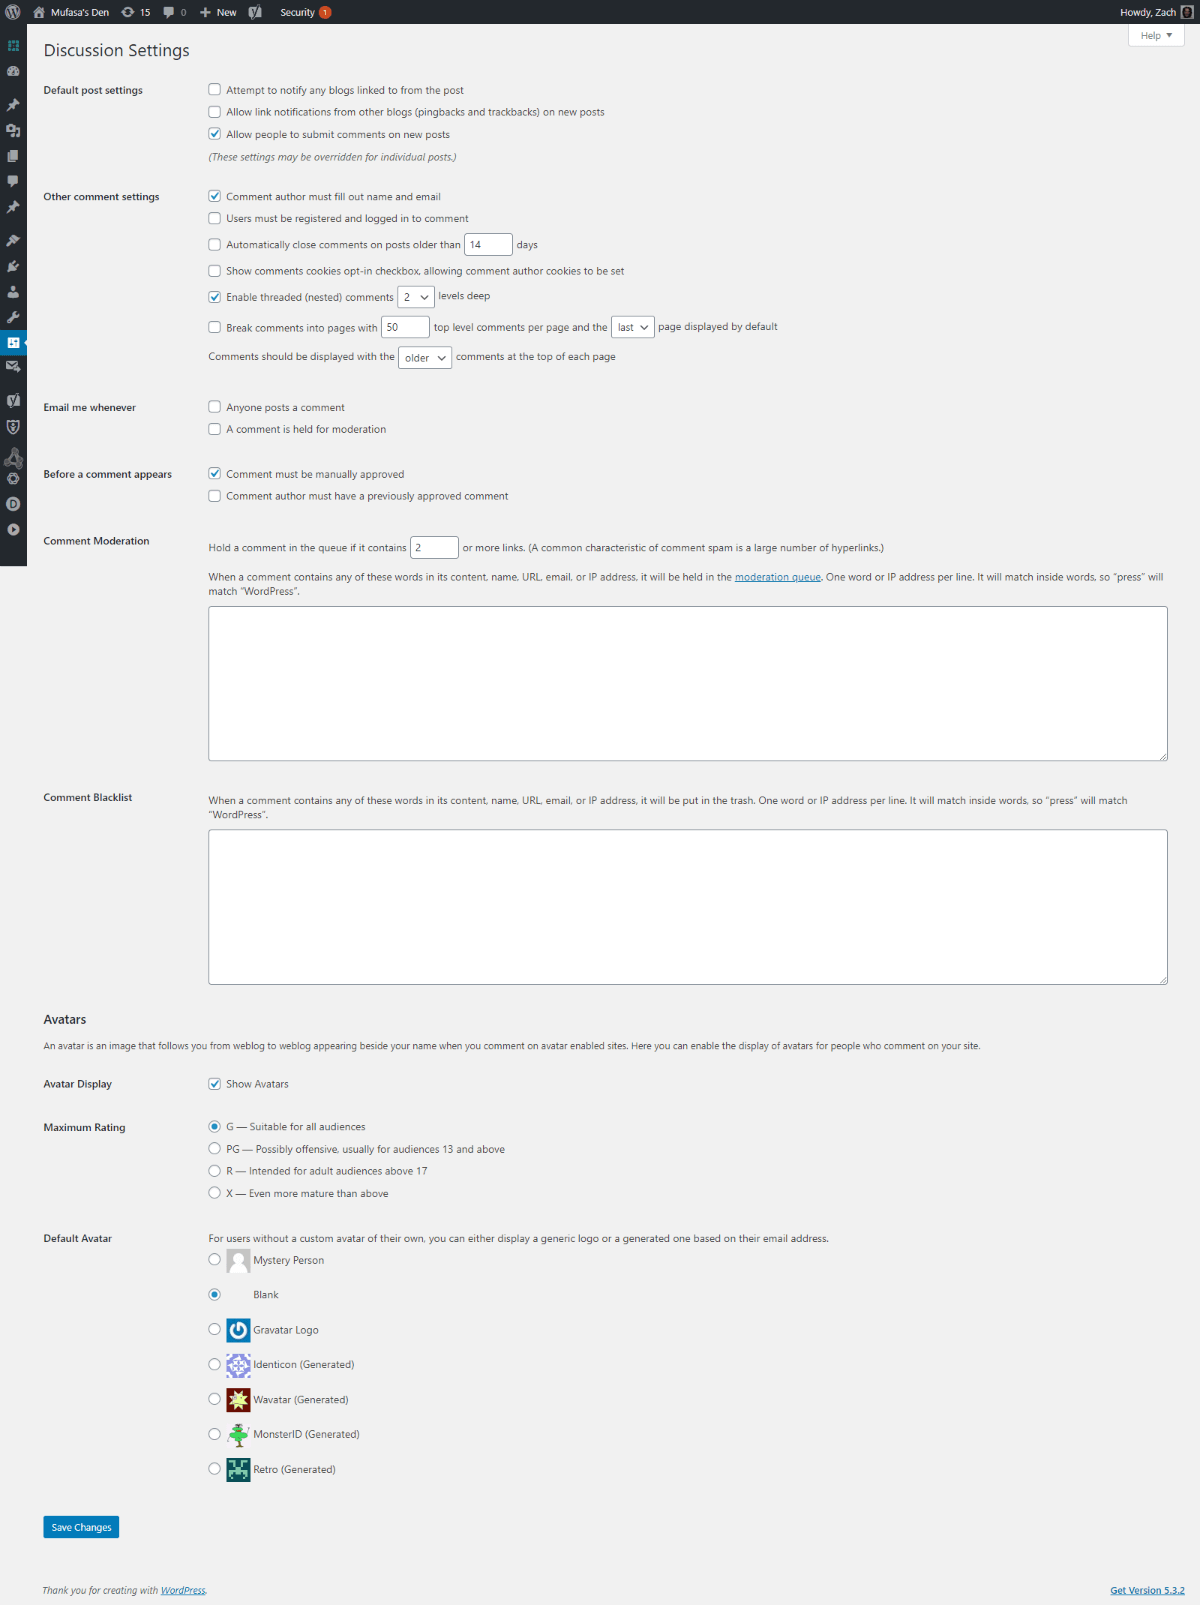
WordPress Discussion Settings
WordPress Discussion Settings are slightly more involved.
This is where you choose your basic comment settings. Some webmaster could probably ignore this. They matter much more for comment-heavy sites. Here, many of the settings allow you to balance engagement and performance. For example, comment avatars help build community on your site but increase page load times.
Go to Settings >>> Discussion.
Copy these settings:
If you’d like more detail:
WordPress Discussion Settings Overview
- Set Attempt to notify any blogs… – Check to send out pingback notifications to other blogs.
- Set Allow link notifications… – Uncheck to block incoming ping and trackback comments.
- Set Allow people to post comments… – Check to allow WordPress comments on your site.
- Set Comment author must… – Check to reduce spam comments and encourage engagement.
- Set Users must be registered… – Uncheck to allow comments without requiring login.
- Set Automatically close comments… – Uncheck to keep comments open indefinitely.
- Set Show comments cookies opt-in… – Uncheck unless you want WP comment author cookies.
- Set Enable threaded (nested)… – Check and select “2” levels deep or desired nesting level.
- Set Break comments into pages… – Uncheck unless you need comment pagination.
- Set Comments should be displayed with… – Choose “older” for aged comments at the top.
- Set Email me whenever – Check “anyone posts a comment” to receive all notifications.
- Set Before a comment appears – Check “Comment must be manually approved” to be safe.
- Set Comment moderation – Use to automate moderation. Can ignore if manual approval set.
- Set Comment Blacklist – Use this as needed to block known comment spam automatically.
- Set Avatar Display – Check to include profile pictures for comments. Increases engagement.
- Set Maximum Rating – Choose “G—suitable for all audiences” or whatever is appropriate.
- Set Default Avatar – Choose “Blank” or “Mystery Person” for better on-page performance.
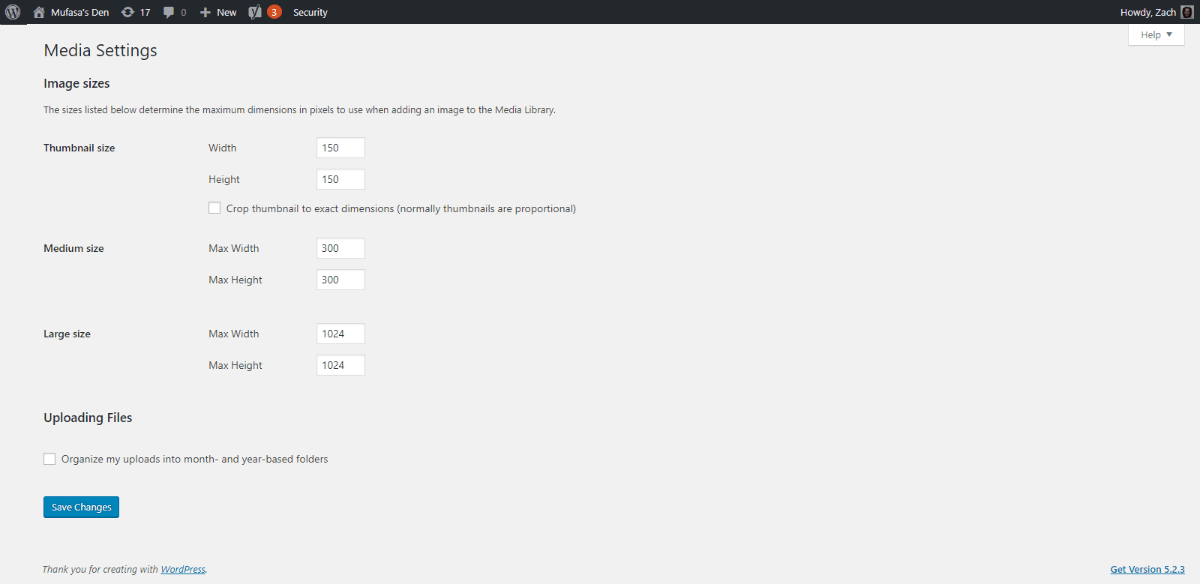
WordPress Media Settings
WordPress Media Settings are another simple group.
Some webmasters might even get away with ignoring these. They become more important as you build out your site and understand what images specs you need. But having them set properly will save you time later. You could consider these shortcuts for useful images sizes later.
Go to Settings >>> Media.
Copy these settings:
If you’d like more detail:
WordPress Media Settings Overview
- Set Thumbnail size – Choose “150” px or desired size. Uncheck crop to exact dimensions.
***Leaving this box unchecked effectively makes the thumbnail settings the same as the medium and large sizes: max height and max width.
- Set Medium size – Choose “300” for Max Width & Max Height or your desired size.
- Set Large size – Choose “1024” for Max Width & Max Height or your desired size.
***Typically, Max Width for large sizes should match the width of basic content areas on your site, such as the basic text area for blog posts.
- Set Uploading Files – Uncheck “organize my uploads…” for cleaner URLs for your media.
***If you want your website images to show up in Google Image Search and other search engines, leave this box unchecked. Leaving the box checked creates date based archives, adds dates to image URLs, and may make managing media easier.***
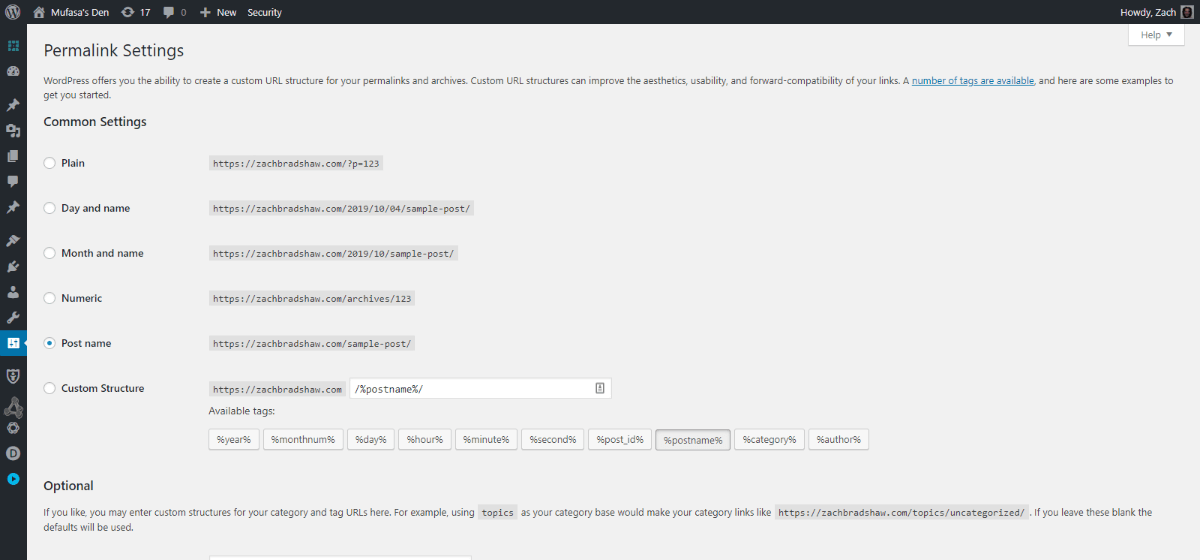
WordPress Permalinks Settings
WordPress Permalink Settings are vital for SEO.
Luckily, getting them right is a cinch.
Go to Settings >>> Permalink.
Copy these settings:
If you’d like more detail:
WordPress Permalink Settings Overview
- Set Common Settings – Choose “Post name.” Other options strongly discouraged.
- Set Category base – Leave blank or customize as desired.
- Set Tag base – Leave blank or customize as desired.
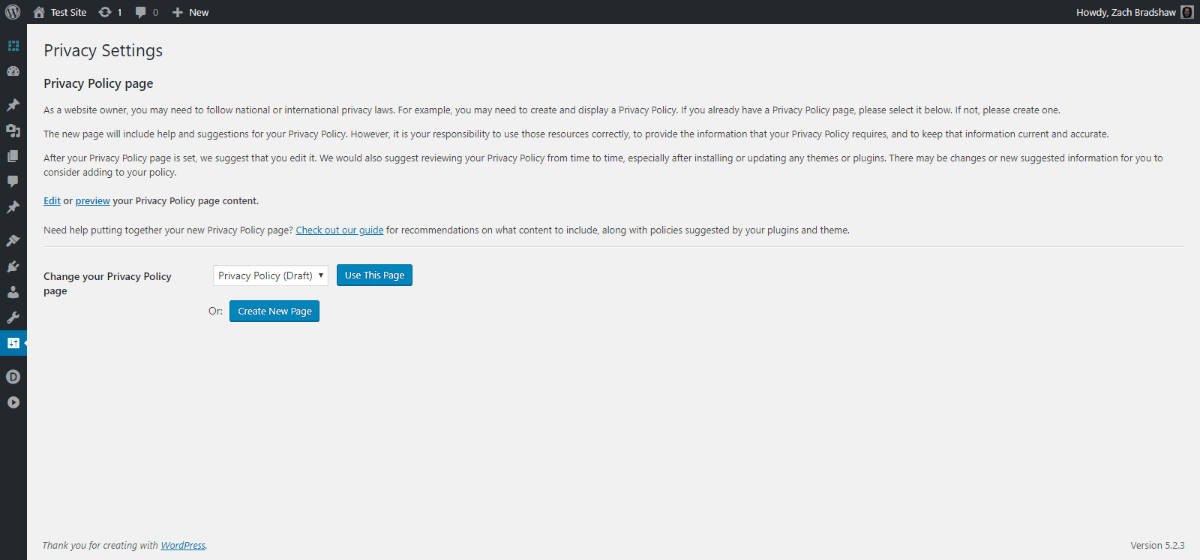
WordPress Privacy Settings
WordPress Privacy Settings need little explanation.
Create a privacy policy then set it here. You might be able to get away with ignoring this but we don’t recommend it.
Go to Settings >>> Privacy.
Copy these settings:
If you’d like more detail:
WordPress Permalink Settings Overview
- Set Change your Privacy Policy page – Choose “Privacy Policy” page. Create one if needed.
Beyond the Basics
Again, various things can impact your install.
But if you’re just getting started, you can pretty much copy our settings and go. It probably makes sense to adjust your menus and remove “starter spam” during this process. Then you can move on to optimize your theme and plugins.
You’ll need to make changes with discernment if you have a pre-existing WordPress site. For example, adjusting your permalinks without a plan usually leads to SEO disaster. Or, you may want to adjust our defaults based on your website goals.
Finally, plugins like Akismet, Simple 301 Redirects, and a3 Lazy Load add their own pages under Settings in the WordPress menu.
This is one of those things that can go on forever.
But this WordPress Settings Guide is about the basics so we’ll leave it here for now.
Have questions or comments? Please drop them below. We know WordPress has lot of moving parts. Plus, we’re always looking to improve our training. And if you’d like help with WordPress Optimization, you can get started with a free SEO audit.